Google Search Console is a valuable tool for website owners and digital marketers to monitor their website’s performance and identify opportunities to improve search engine rankings. One of the essential steps to start using Google Search Console is to add your website and verify ownership. Additionally, it’s crucial to add user to google search console to help manage the website’s performance data effectively.
In this article, we’ll guide you through the process of adding a user to Google Search Console, starting from creating a Google account to granting access to specific users. We’ll also discuss the different access levels available and how to manage them.
Step 1: Create a Google Account
Before adding a user to Google Search Console, you must first create a Google account. If you already have a Google account, skip this step and proceed to the next one.
Here’s how to create a Google account:
- Go to the Google Sign Up page (https://accounts.google.com/signup).
- Enter your first and last name in the appropriate fields.
- Choose a username that you’d like to use for your Google account. This will also be your email address.
- Create a password and confirm it in the next field.
- Enter your birthdate and gender.
- Provide your phone number or an alternative email address in case you forget your password or need to recover your account.
- Click on the “Next” button.
- Review Google’s terms of service and privacy policy.
- Click on the “I Agree” button to create your Google account.
Once you’ve created your Google account, you’re ready to proceed to the next step.
Step 2: Add Your Website to Google Search Console
The next step is to add your website to Google Search Console. This step is essential because it verifies your ownership of the website, and without it, you won’t be able to access the website’s performance data.
Here’s how to add your website to Google Search Console:
- Go to the Google Search Console page (https://search.google.com/search-console/about).
- Click on the “Start Now” button.
- Enter your website URL in the field provided and click on the “Add Property” button.
- Choose your preferred method of verifying ownership. Google provides several options, including HTML file upload, domain name provider, Google Analytics, and Google Tag Manager. Choose the method that’s most convenient for you and follow the instructions provided.
Once you’ve verified ownership of your website, you’re ready to proceed to the next step.
Step 3: Add User to Google Search Console
To add a user to Google Search Console, you must have already verified ownership of your website. Adding users to your Google Search Console account allows multiple people to access and manage the website’s performance data.
Here’s how to add a user to Google Search Console:
- Go to the Google Search Console page (https://search.google.com/search-console/about).
- Click on the name of the website you’d like to add a user to.
- Click on the “Settings” icon on the left-hand side of the screen.
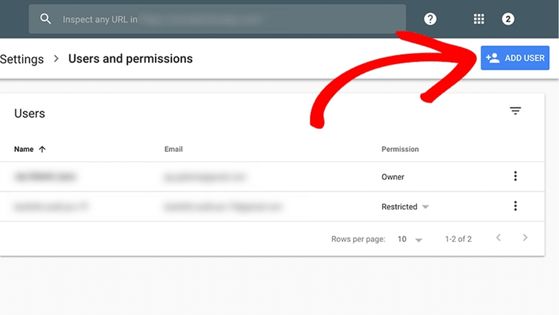
- Click on the “Users and permissions” tab.
- Click on the “Add user” button at the top of the page.
- Enter the email address of the user you’d like to add to Google Search Console.
- Choose the access level you’d like to grant the user. We’ll discuss the different access levels in the next section.
- Click on the “Add” button.
Once you’ve completed these steps, Google Search Console will send an email invitation to the user you’ve added, and they’ll be able to access your website’s performance data.
Step 4: Manage User Access Levels
Google Search Console offers three different access levels for users: owner, full, and restricted. Each access level has different permissions and capabilities, and it’s essential to choose the right access level for each user based on their role and responsibilities.
Here’s a brief overview of the different access levels:
Owner
The owner has full control over the website and the Google Search Console account. They can add and remove users, change settings, and view all website data.
Full
Users with full access can view all website data and make changes to settings, including adding and removing other users. However, they can’t remove the owner’s access or delete the Google Search Console account.
Restricted
Users with restricted access can view website data but can’t make any changes or access sensitive information. They can’t add or remove users or change any settings.
To manage user access levels, follow these steps:
- Go to the Google Search Console page (https://search.google.com/search-console/about).
- Click on the name of the website you’d like to manage user access levels for.
- Click on the “Settings” icon on the left-hand side of the screen.
- Click on the “Users and permissions” tab.
- Find the user you’d like to manage access for and click on the three dots next to their email address.
- Select the appropriate access level from the dropdown menu.
It’s important to choose the right access level for each user based on their role and responsibilities. For example, you may want to grant full access to your web developer or digital marketing agency, while giving restricted access to other team members who only need to view website data.
Conclusion
Adding a user to Google Search Console is a straightforward process that involves creating a Google account, adding your website, and granting user access levels. By adding users with specific access levels, you can effectively manage your website’s performance data and collaborate with your team to improve search engine rankings.
Remember to choose the right access level for each user based on their role and responsibilities. By doing so, you’ll ensure that your website data remains secure and that each user can access the information they need to do their job effectively.